Rava Idli is one of those classic South Indian dishes that everyone loves for breakfast. Soft, spongy, and slightly tangy, it’s not just delicious but also light and quick to prepare. Unlike traditional idlis made with rice and lentils that require soaking and fermenting, Rava Idli is made with semolina (rava or sooji) and can be ready in under an hour. The real secret lies in getting that perfect soft and fluffy texture. If your Rava Idlis have ever turned out dense or sticky, this guide will help you fix that. Here’s how to make them perfectly soft in just five simple steps.
Step 1: Gather the Right Ingredients
The foundation of any good Rava Idli lies in using the right ingredients in the right proportions. You’ll need:
- 1 cup of semolina (medium rava or bombay rava)
- ½ cup of curd (fresh, slightly sour is fine)
- 1 tablespoon of oil or ghee
- ½ teaspoon mustard seeds
- A few curry leaves
- 1 teaspoon chana dal and urad dal each
- 1 finely chopped green chili (optional)
- 1 teaspoon grated ginger
- ½ teaspoon baking soda or Eno fruit salt
- Salt to taste
- Water as needed
For extra flavor, you can also add a handful of chopped coriander leaves or grated carrots. Always make sure your semolina is fresh and free of moisture because old rava can make the idlis hard.

Step 2: Roast the Rava Properly
One of the key steps in making soft Rava Idlis is roasting the semolina correctly. Heat a pan and add a tablespoon of oil or ghee. Add mustard seeds, let them splutter, then add the dals and curry leaves. When the dals turn golden brown, add the rava and roast it over low to medium flame for about 5 to 7 minutes. Stir continuously to avoid burning.
Properly roasted rava should release a mild aroma and feel light when you stir it. Roasting removes excess moisture from the semolina and ensures the idlis turn out fluffy instead of sticky. Once roasted, let the mixture cool down completely before moving on to the next step.

Step 3: Prepare the Batter
After the roasted rava has cooled, transfer it to a mixing bowl. Add curd and salt, then slowly add water to form a thick, smooth batter. The consistency should be similar to that of regular idli batter neither too thick nor too runny. Let the mixture rest for about 15 to 20 minutes.
This resting time allows the semolina to absorb moisture, making the batter light and airy. If the batter thickens too much after resting, add a little water to loosen it. Just before steaming, add the baking soda or Eno fruit salt and mix gently in one direction. The batter will start to bubble slightly, which is a sign that it’s ready for steaming.

Step 4: Steam the Idlis Correctly
While the batter rests, prepare your idli steamer or pressure cooker. Grease the idli molds with a few drops of oil to prevent sticking. Pour the batter into the molds, filling them about three-quarters full to allow room for the idlis to rise.
Steam the idlis for about 10 to 12 minutes on medium heat. Avoid opening the lid frequently as this can affect the cooking process. To check if they’re done, insert a toothpick or knife into one idli.if it comes out clean, they’re perfectly cooked. Once done, let them cool for a minute before removing them from the molds.
If you are using a pressure cooker, make sure to remove the whistle and do not use high flame. Gentle, even steam gives the best results. Over-steaming can make the idlis dry, while under-steaming can leave them sticky.

Step 5: Serve Fresh and Fluffy
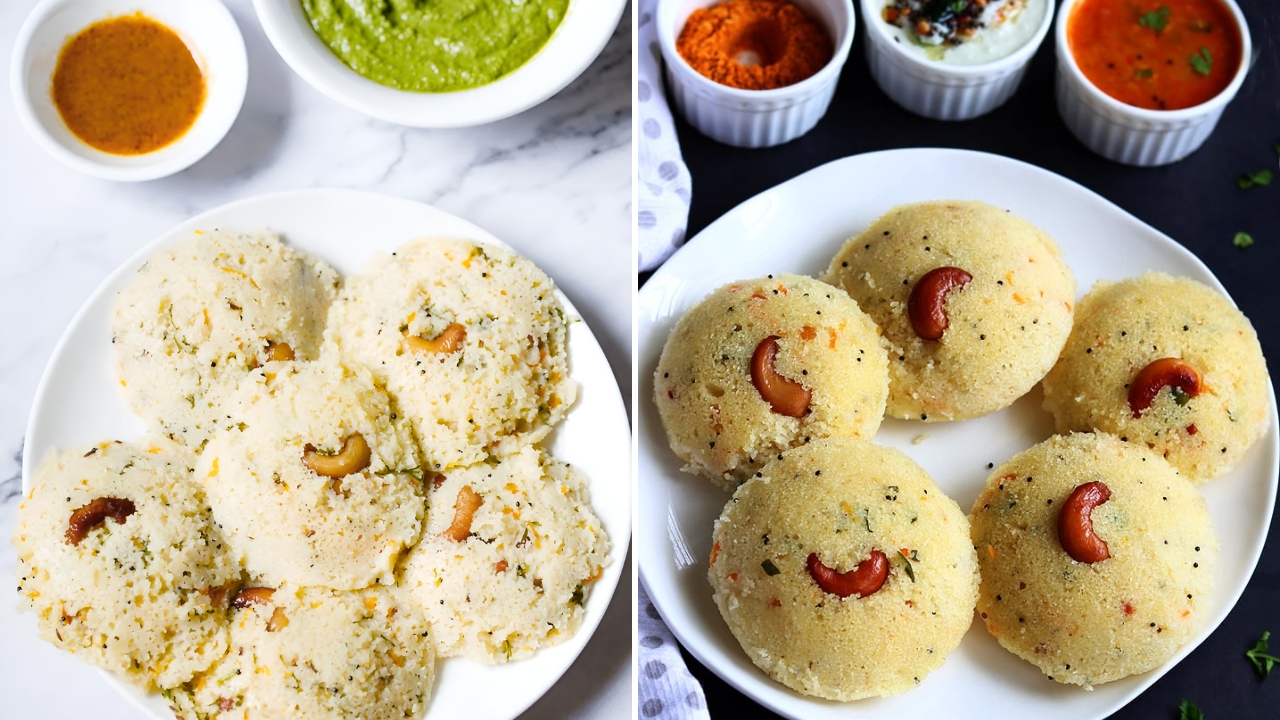
Freshly steamed Rava Idlis are best enjoyed hot. Gently remove them from the molds using a spoon and serve immediately. They taste delicious with coconut chutney, sambar, or even a simple tomato chutney. For a special touch, drizzle a little ghee over the idlis before serving.
If you want to prepare them ahead of time, you can make the roasted rava mix in bulk and store it in an airtight container. When you’re ready to cook, just mix in curd, water, and baking soda, and you’ll have fresh idlis in minutes.
To keep the idlis soft even after cooling, cover them with a damp cloth or store them in a closed container until serving time. Avoid refrigerating them for long hours as they tend to lose their softness.

Additional Tips for Perfect Texture
- Always use fresh curd too sour or old curd can make the idlis dense.
- Do not overmix the batter after adding baking soda or Eno; it can deflate the air bubbles.
- Medium-grain semolina gives the best texture. Very fine rava can make idlis sticky, while coarse rava makes them crumbly.
- Resting the batter for the right amount of time (15 to 20 minutes) helps the rava absorb moisture evenly.
- If you want a healthier twist, you can add grated vegetables like carrots or peas for extra fiber and color.
Why Your Rava Idlis Might Turn Hard
If your Rava Idlis often come out hard or rubbery, the problem is usually over-roasting the semolina or adding too little curd and water. Also, skipping the resting time or steaming on very high flame can result in unevenly cooked idlis. Always remember that Rava Idlis need gentle steaming and balanced moisture to stay soft.
Final Thoughts
Making soft and fluffy Rava Idlis is much easier than it looks once you know the right technique. The combination of roasted semolina, curd, and gentle steaming creates a perfect balance of texture and taste. Whether you’re preparing them for breakfast, brunch, or a light dinner, these idlis never disappoint. They’re quick to make, easy to digest, and pair beautifully with a variety of chutneys and sides.

Once you’ve mastered this 5-step method, you’ll never have to depend on ready-made idli mixes again. Homemade Rava Idlis always taste fresher and more flavorful, and the satisfaction of making them from scratch is unbeatable.
Disclaimer
This article is for informational and educational purposes only. Cooking results may vary depending on ingredient quality, measurements, and equipment used. Always adjust recipes according to your taste and preferences.